Not all people know How to install Ethernet Security Camera while it’s important.
Nowadays, technology has advanced the way security cameras are made. In the past, the old CCTV cameras had limited features. But now, They have improved in terms of quality, functionality, features, along with reduced prices.
Lately, Ethernet security cameras have bloomed on the market like anything.
Top-notch high-definition color cameras have replaced conventional Security cameras. For these reasons and more customers love to have Ethernet PoE cameras and they want to learn how to install them.
Don’t worry, The process to install an Ethernet security camera has become relatively easy, along with its maintenance charges and efforts.
In This blog post, you’ll figure out how to install Ethernet security cameras, and what are the tools required for the installation process, Plus alternative ways to install Ethernet security camera.
Note: This blog post can’t replace any professional assistance but will surely help you with the basic steps. Continue reading the entire post to get disclosed to the steps.
Now, Let’s Start
What are the Tools Required to install Ethernet Security Camera
There are many tools used for the mounting of an Ethernet security camera. But the following 5 components are anyhow required to install a wired security camera perfectly.
● Security Video recorder: The security camera recorder is the heart of any surveillance camera system, and with PoE (Power over Ethernet) cameras you should use NVR(Network Video Recorder).
● PoE Switch: The PoE Switch needs to be 802.3af as it is the connector between cameras and the recorders.
● PoE IP Security Camera: These will be the eyes of your entire surveillance system.
● CAT6 or CAT5e Cables: Good quality CAT6 and CAT5e cables are crucial for accurate data between cameras, recorders, and PoE switches.
● Internet or WIFI routers: Ethernet security cameras’ essential requirement is an internet connection. Thus a router for inter access is a must.
So, to install an Ethernet security camera, the only additional requirements are some wires or cables, Fish tape, Drill, Pencil.
Note: Factors like lighting, weather, purpose, and decoys play a massive role in perfectly installing a wired security camera.
Now are the steps for installing an Ethernet security camera. Even beginners can go through them to figure out how to perfectly set up the Ethernet security camera at their place.
How to Install Ethernet Security Camera Steps
In this segment, we have discussed how to install an Ethernet security camera step wise. Follow each step to successfully establish an Ethernet PoE camera.
Step1: Select The Best Location
Before getting into the details to install Ethernet Security camera, let’s see some of the suitable places where you should install them.
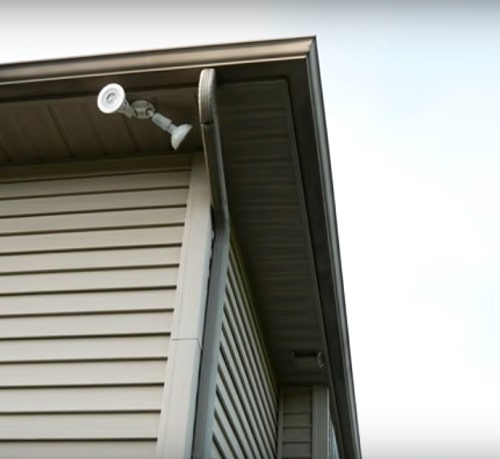
It would be best to be highly careful before choosing the locations, as some areas hold more priority than others.
You don’t want to end up putting cameras in unnecessary places and, at last, get no fruitful outcome.
Surveillance Cameras must be installed in the correct places so that you can watch over all the essential areas of your desired place. What I mean is that you need to 1st look for every area and corner inside and outside of your property.
So, the first area which needs to be covered by your Ethernet security camera is the outdoors, like the main gate or entrance and its corresponding regions.
Then comes the front door, as most people enter from there. The back door or any other weird door position if your house has any, and also Street windows. Then comes the yard, lawn, or garden area.
Lastly, preferred indoor areas. The indoors of a house also needs surveillance. It would be best if you installed a camera in the familiar halls or living room and not the private portions of the house.
If you don’t have a garden or yard, put a camera on your garage or garage entrance in case you need to save your vehicles too and add more protection for your cars.
Therefore choosing the correct spots for your security cameras is highly essential for a secure environment.
Step2- Prepare the Required Equipment
Ethernet cameras require a Poe switch, PoE Injector, or NVR for their network connection. Other than the PoE switch, you need cables, switches, and some adjustments to the camera.
You need to thoroughly check the cables and the switches before connecting them to the camera, you can use a cable tester from any of your friends or buy one from any online store, it’s cheap.
Step 3- Set a Plan For Connections and Devices
Planning is a significant factor before installing outdoor/indoor security cameras. The cameras installed always need to be examined precisely to ensure that the entire area is under surveillance.
It may occur later to add or remove cameras after installation, so avoid this by planning before fixing cameras randomly.
Secondly, you need to add network switches with PoE. The Ethernet cameras need to attach to the network with PoE switches that include or use a PoE injector.
The network switch must be versatile enough to support IP devices and multiple ports.
You can read the instructions and separate specifications to ensure that power gets flowing in all the cables and ports.
Third, Bring a sheet of paper and start to draw the locations of your cameras and where you want to mount your central devices.
Once you finish this, go and measure the wired router between different devices to pick an Ethernet cable with a suitable length, not long or short.
Then drill holes for the required cables, and wires through walls and ceiling to connect them with the Ethernet camera.
Note: The power budget in switches sometimes limits the power to all ports, so being precautions is necessary.
Step4- Attach mounting brackets to walls or ceiling
Ethernet security cameras need mounting to attach brackets. The areas you have chosen to install a camera need brackets on which the camera will hold itself. They simply connect RJ45 to the network with a PoE switch.
Mount the camera carefully into the brackets and adjust them accordingly. They need to be at proper angles to keep an eye on the area you want to survey.
The mounting is not easy. You may require professional help. But it is best to drill holes on the walls or ceiling for installing the brackets perfectly.
Step 5- Run the Ethernet cable
To view your camera surveillance recordings on PCs, smartphones, or laptops, you need to run the Ethernet cable between security cameras, NVR and Switch.
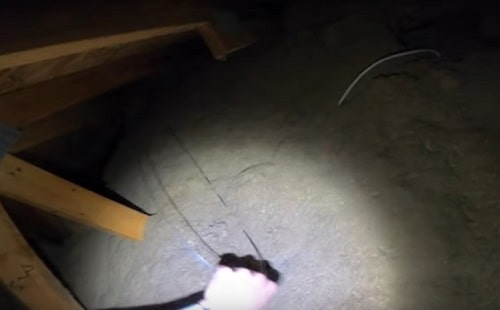
A lot of camera companies will provide you with the essential tools required to install the Ethernet camera. You just need to figure out where each cable and switches need to be attached.
In general, you may need to get fish tape to help you run your camera network cables through the soffit or walls.
Also, you need to ask a friend or any of your family members to help you pull the wires from the other side.
Step6- Connect the Ethernet camera with NVR
NVR is highly flexible. It is also the easiest way to install recording footage in Ethernet cameras. Other than installing complicated software, connect the Ethernet cameras with NVR for a smooth process.
Once you finish connecting cameras to the video recorder device, then you should download and install the camera mobile app on your smartphone.
Go to your mobile store and search for your camera brand app, download it, and after that create an account to add your cameras.
Step 7- Adjust Camera Viewing Angle
Once you finish the above steps successfully that means you complete 90% of the installation process of Ethernet camera.
As we know, the surveillance video can be seen on web browsers on your mobile or laptop. The final adjustments of the camera are only possible after you can see those recordings.
Check each angle and test which one gives you the best coverage, if you find it’s not suitable, then change the angles of the cameras.
The cameras can be tilted, rotated, moved pan-wise, and even zoomed depending on your camera type. For example, you can keep the entrance camera zoomed in to properly notice who is entering each time.
For more visual information about how to install Ethernet Security Camera, you can see the next video
Source: Carson Miller
Are there any Methods to Install a PoE Ethernet Security Camera?
Well, there are 3 alternatives that you can use to install Ethernet security camera on an aluminum soffit, brick wall, or any place you want.
The differences between the below ways are that every method has various central devices, and each one of them is used according to the number of cameras you have in your wired system.
Let’s see
Method1: Installation with PoE Switch:
A PoE switch is the easiest and most convenient way to set up an ethernet security camera, especially for large places.
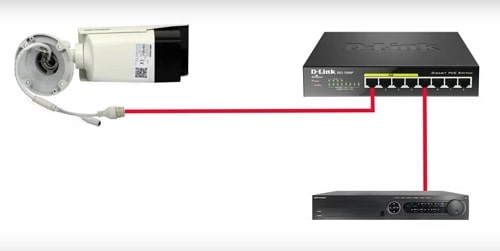
For this, you need to connect your cameras with the PoE switch. The switch is the bridge device that powers the entire camera and allows them to send and receive data.
Method2: Installation with PoE Injector:
You can also install ethernet security cameras with the assistance of a PoE injector. It is for customers who don’t have a PoE switch and have only a single camera and want to link it with the network router.
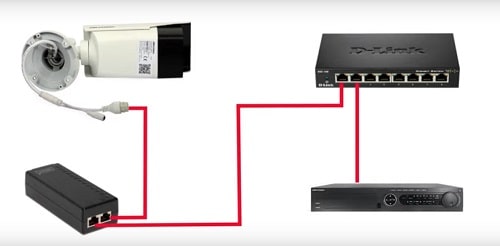
The PoE injectors only have one port and are powered by a power adapter, so this won’t be the ideal option if you have multiple ethernet cameras.
To complete this setup process, you must first plug the ethernet security cameras and connect the other end to the PoE injector. Then draw another data cable from the PoE injector to the Wi-Fi Router. Then simply, turn the power supply to complete the setup.
Method3: Installation with PoE NVR or Router:
Have you been trying to connect PoE cameras with non-compatible PoE routers? Then here is the solution. First, install a PoE NVR that powers your PoE cameras.
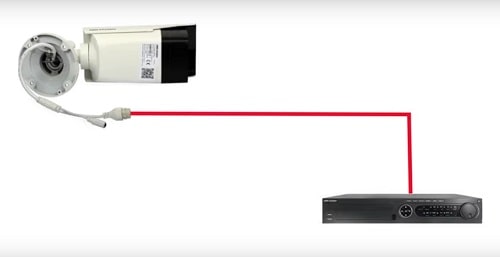
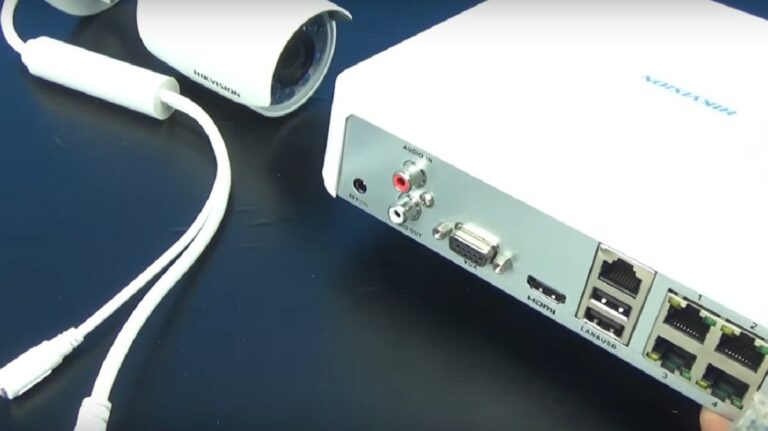
Then it is pretty easy, and you just need to connect a PoE cable to 4, 8, or even 16 PoE ports to NVR from your PoE camera.
The NVR must be connected to the power supply, and the NVR must be perfectly connected to the router. Ethernet security cameras, when installed with NVR, have great storage options. The storage of footage increases drastically with NVR.
Summary
We hope that this blog was informative enough for you to set up and install Ethernet security camera on your own.
Generally, Ethernet cameras reconfigure to their default Wi-Fi connection. And this makes it way easier to use these security cameras.
As we mentioned, there are multiple ways to install and connect Ethernet cameras, and you just have to figure out your ideal mode of installing them in your place.

Can’t connect my phone to my dvr
Hi,
First, you need to make the troubleshooting for the connections and your system devices, Troubleshooting for your issue will be
1- Check if the connection between the DVR and your wifi router is working or not?
2- Look at the DVR setting and see the configuration of IP and DHCP.
3- Contact your camera brand support to and ask them if there is any bug with the DVR software or the mobile app.
NOT only that, there will be more steps of troubleshooting depending on your case, the above steps may solve your issue and get your DVR connected back to the phone again.