You’ll be more secure if you decide to add audio to security camera that you installed before but how?
As we know, a security camera is a great way to keep an eye on your home or office when you’re not there. But they’re not very good at telling you what burglars are talking about while they are walking into your home or office.
This is where external microphones or surveillance cameras with built-in microphones can help.
But the bad news is not all security cameras have audio recording features and that is a big problem for people who are seeking 100% protection. So today I’m going to talk about a few different ways to add audio to security cameras. Let’s see
Why you should add audio to security camera
Adding audio to a security camera will give peace of mind in concern for your home and family safety, by using a security camera with audio, whatever built-in mic or external speaker you’ll be allowed to hear what’s happening on your property.
In old CCTV analog cameras, customers always complain from first low video quality, and second inability to hear sound in videos to detect if persons are talking or if there are cars moving or anything else. In most cases, having surveillance cameras with audio will be helpful for you to prevent crimes or to communicate with others by using your monitor device.
What microphones to use with security cameras
Most microphones are suitable to use with CCTV cameras or IP cameras but there are some important factors that every mic should have. For example,
- Sound quality is picked by the mic.
- Coverage range.
- Technology.
- Capability to work with NVR or DVR.
- Sensitivity.
- Weatherproof ( For outdoor cameras only).
These are the common factors that you should look for while searching for the best microphones for CCTV, and there are some additional things that you should be careful of such as where you’re using your Cam, is it inside or outside.
The factors above apply when choosing an indoor camera, in case you have an outdoor camera you must look for a weatherproof mic to use with your security cameras.
How to position the microphone In Security Camera
After finishing the process of adding audio to the security camera you should adjust the camera viewing angle and direct it to the place you want to watch on your mobile or screen. The same also should be done with the external microphone that you add to your camera if you have a monitor device with a built-in mic so you don’t have to position it.
For positioning of the microphone in security camera, you should follow specific rules to get the best clear sound of your mic in the recorded videos, rules such as
- Put the mic away from the cam for a few feets if your cam makes an annoying sound.
- If you bring the mic for monitoring the front door of your house, make sure it’s at a suitable height to enable it to hear the sound of anyone on the door.
- Direct the mic in the same direction as the camera.
By applying the above rules you get more than one benefit, first, your mic will record a clear sound without noise, second, you protect your sound recording device from being damaged by the vandals.
When not to use a microphone
People who are thinking about how to add audio to security cameras sometimes don’t know how to use audio, or where. Monitoring or recording sound by security cameras is not allowed in case your cam is violating the privacy of your family members or neighbors.
So, microphones in security cameras aren’t used in bedrooms, bathrooms, or any place in the home that breaches privacy. In businesses, you’re not allowed to use the mic of the surveillance cameras to record the voice of your employee or clients.
To be safe and have the freedom to use the microphone of the camera, you should read your state’s law about using microphones, or in case you bring a security camera with a mic to record or communicate with your pets, you can use the small audio device.
How to connect the microphone to the security camera
When it comes to adding audio to a security camera you may get confused as there are more than one type of microphone, security cameras, and also the connection between the devices.
But in general, to add audio to security camera you need to follow the simple structure, run a power cable for both microphone and security camera, then run the audio signal from the mic to the audio input in the video recorder, and the last thing is to hook up the camera to the recorder video input.
Now, Let’s dive into and see every method
How to Add Audio to a DVR
This method is considered the simplest among the others as it doesn’t require a professional to do, it’s a DIY method and suitable for beginners and anyone with a little knowledge of security devices.
But, First, take a look at the equipment
What Are the Tools Required for Connecting a Microphone to a DVR
Before you start the connections you probably have a DVR with an “Audio Input” port on its back, so the essential requirements are
- Analog or HD-Analog DVR and make sure it has RCA audio inputs to connect your mic.
- A pre-amplified mic is known as a line-level microphone.
- 12V DC power adapter for the mic.
- Single RCA Cable.
- Coaxial cable in case you have a long-distance for the mic.
These are the important things that you need to get your job done.
Steps to Connect a Pre-Amplified Mic to a DVR
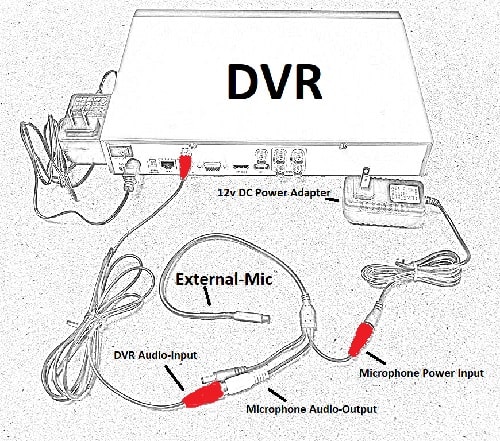
Step1: Plug in the power adapter to the microphone( The power is Always Take the Red Color).
Step2: Connect the RCA female of the MIC (have a White color) to the RCA male of the cable.
Step3: Run an RCA cable from the mic to the Audio input port of the DVR.
Steps to Connect the microphone to a DVR using Premade Siamese cable
If you want to connect the mic to a long-distance security camera that is mounted away from DVR, you may need to get a Pre-Made All-in-One Siamese cable and RCA power adapter. And Here are the steps
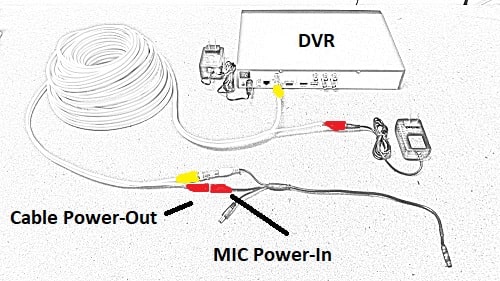
Step1: Plug in the power adapter to the red line of the Siamese cable.
Step2: Connect the yellow line of the Premade Coaxial cable to the audio input port of the DVR.
Step3: Run the cable to where your camera has been installed.
Step4: Take the second red line of the Siamese cable and connect it to the power of the mic.
Step5: Hook up the white line of the microphone to the yellow line of the cable.
How to Add Audio to CCTV Security Camera
To add audio to security camera, you should have an analog CCTV camera, a Pre-Made All-in-One cable that has video, audio, and power lines, and the last thing is the power adapter.
So, adding audio to a CCTV camera is done by connecting the power adapter to the red line of the cable to provide power for both microphone, and camera. After that, hook up the white line to the audio input, and the yellow line to the video input Respectively.
On the other hand, take the terminals of the Siamese cable and connect the red line to the power of the microphone, then the yellow line to the CCTV camera, and at the last is to provide the camera with power by taking the output terminal of the mic to the input of the camera.
If you’re still confused here is the detailed step-by-step instruction
How to Connect Your Pre-Amplified Microphone and CCTV Security Camera to a DVR
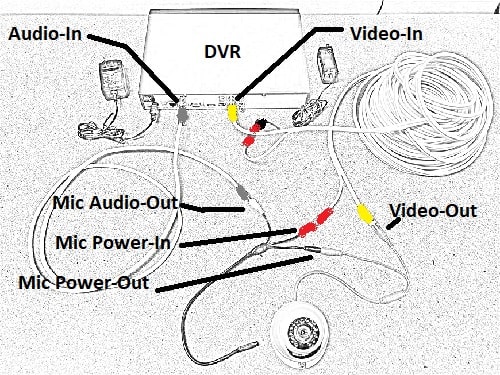
Step1: Bring the 12v 1A DC power adapter and plug it into the red terminal of the cable.
Step2: Hook up the RCA Male of the white terminal to the Audio input port of the recorder.
Step3: Connect the BNC male (which has yellow color) of the cable to the Video input channel of the DVR.
Step4: Bring the mic and connect the red line of the cable to the power input (the red female connector) of the microphone.
Step5: Link the RCA female of the mic (White line) to the RCA male with the same color of the all-in-one cable.
Step6: Take the power output ( Black Line male connector) and connect it to the power input of the security cam.
Now you’re finished and you just need to plug in the power adapter to the electric outlet and test the connections.
How to Add Audio to PoE Security Camera
To add audio to security camera, especially the PoE (Power over Ethernet) IP camera, it’s different from the previous methods.
The concept behind making a PoE camera work with an additional microphone is the same but the connections are different.
To add audio to the IP PoE camera you should first connect the Ethernet cable from the NVR(Network Video Recorder) to a PoE splitter, then connect the network cable to the Ethernet port of the camera, and the DC power black wire of the splitter to the power input of the Microphone, Next connect the DC power output of the mic the power input of the camera.
These are the steps in a brief, If you want to know more read the detail below
What are the tools required for adding External Microphone to the PoE camera?
- PoE security camera that supports an external microphone.
- External High-Quality Mic.
- A 1-to-2 Power over Ethernet splitter.
- Cat5, Cat5e, or Cat6 Ethernet Cable.
- RCA connection to link between cables.
- Switch, and NVR in case you have more than one PoE internet protocol cam.
Now, Let’s see the steps
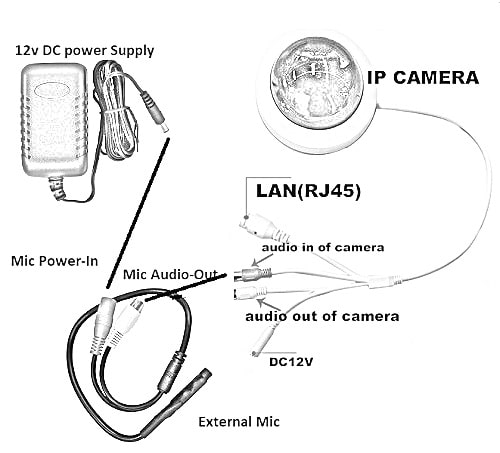
Step1: Take the Ethernet cable from the NVR, or Switch and connect it to the PoE Splitter.
Step2: From the Splitter, Take the DC power output and connect it with the DC power input(Red Line) of the mic.
Step3: The Ethernet wire of the splitter connects it to the Ethernet port of the camera.
Step4: Hook up the power output of the mic (white line) to the power of the camera, you may use an RCA connection.
Step5: Connect the Ethernet cable to the RJ45 port of the NVR or Switch and enjoy.
How to Add Audio to PoE Security Camera For Long Distance
It’s possible to add audio to security camera wherever you mount it. External microphones can be attached to the security camera with different connections.
So, If you’re gonna use this method you probably have a PoE security camera with a separate power supply.
To add sound to a surveillance PoE camera. First, bring the camera and connect the Ethernet cable from the NVR or Switch to the Ethernet port of the camera, this connection will provide power to the cam, and make the camera send and receive data via network cable. After that, link the Audio In wire of the cam with the BNC coaxial cable male, and next connect the female power jack of the microphone to a 12 DC power adapter.
This method combines the connection of a microphone to a CCTV and IP camera. Here are the steps
Step1: Bring the Coaxial cable, then connect the Power wire (Red-line) to a power adapter.
Step2: On the other side, Connect the power line of the Siamese cable to the power jack on the mic.
Step3: Bring a second Coaxial cable to make the connection between PoE and the Mic.
Step4: Use an RCA Male to RCA Male connector and Hook up the microphone to RCA audio input on the camera’s pigtail.
Step5: For the camera, Connect the Ethernet cable coming from the NVR or Switch to the PoE port of the camera to provide power and data.
Step6: Configure the camera setting to make the camera record audio.
This is the process of adding an external microphone to security cameras that doesn’t have a built-in mic. For more watch the next video
Source: Security Camera King
An alternative way of adding or Connecting microphone to the security camera
Another easy way to enjoy hearing the sound of your recorded videos is by having a security camera with a built-in mic.
There are a lot of surveillance cameras out there in the market that provides HD videos with recorded audio of what happens while capturing the footage. These cameras, whatever their type wired, wireless, or wire-free all have a built-in microphone.
But there are a few differences between the built-in microphone and an external mic that you pick from the store.
The External pre-amplified microphones enable you to record any sound around the camera range as you control where you want to use the microphone.
Another thing is the features that the microphone has, most of the internal mics included with the camera detect and record sound in a small range. Plus, the noise cancellation exists in high-quality mics, so depending on your camera brand you’ll see how your camera sound is clear.
Summary
Lastly, Security is very important in your home. You can achieve this by having security cameras in your home.
These cameras with audio recording capability are installed to make sure that your home is secure even when you are away for long periods of time or having a vacation.
Moreover, By knowing how to add audio to security camera, you will increase your property protection level at all times.
